KEY - Cornell Notes for Lesson 3 (click here) - QUIZ ON 4/17 FOR PERIOD 1 AND 4/18 FOR PERIODS 5 AND 6
3/20/19 - Introduction into Changing Color, Materials, Textures, and Lighting in Shapes - Create a new Lesson 3 folder followed by a new blank scene called "L3Practice1". Following along in the video as you learn about changing colors, materials, textures, and a brief introduction into lighting.
3/20/19 - Practice Assignment - Go back to your two Maya assignments (Snowman and Rocket Ship) and add colors and materials to various objects in both. Resave both with the word "Color" at the end of each (now called "Snowman Color" and "Rocket Ship Color"). Add a new slide to your Google Slide Portfolio titled "Let's Add Some Color To Maya" followed by two screenshots of your new assignments in color.
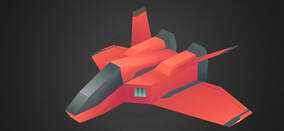
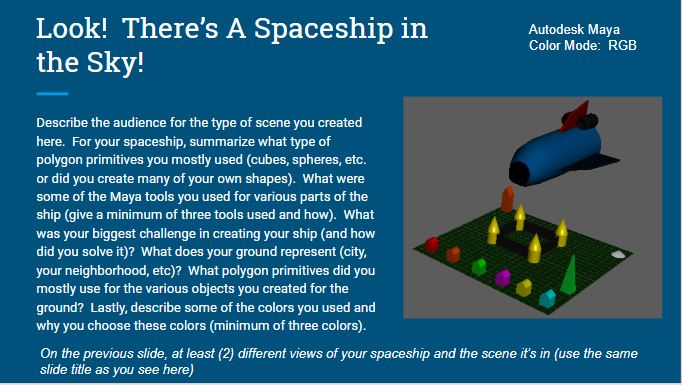
3/21/19 - Assignment: Look There's a Spaceship in the Sky! - You are going to combine your skills from both Lesson 2 and Lesson 3 to build a scene where a spaceship is flying overhead with a smaller scene shown below on the grid. Create a new Maya (call it "Spaceship" in Lesson 3). Look for a picture of a low poly spaceship (something with wings; no UFOs) you want to try and duplicate in Maya. Use your knowledge of transforming and modeling tools to now build this ship (it doesn't have to look perfect; you can customize how you like). Then on the grid, you will create a simple scene as if the spaceship is high in the sky and we can see the scene below on the ground. Maybe you build a small neighborhood. Or maybe you have the ship flying over Colony High School! Use Google Maps (satellite view) to help you with how the layout would look below on the ground (keep this simple; no major detail is needed here; just some cubes and other simple objects representing buildings, houses, streets, etc.). When you are done with everything, give your scene some color. - DUE TUES, 4/9
Directions for "Spaceship" Artist Statement (click here) - DUE WED, 4/10
4/4/19 - Understanding the Basic Shader Types - Create a new blank scene called "L3Practice2". Following along in the video in creating the four spheres and four cylinders you'll need for your tutorial video. Then watch and follow along as you see the differences in some of the key shaders you've been using so far.
4/4/19 - Image Files Used as Textures - Use the same practice file you used from the previous video you just watched (L3Practice2). Following along in the video in adding another sphere to your screen. Then you'll learn about adding images as textures to your objects.
4/8/19 - Adding Materials and Shaders using Hypershade - In the Handouts folder for this class, copy/paste the file called "L3Practice3" into your Lesson 3 folder. Follow along in the video as you go over another way to add materials to more complex 3D Models using the Hypershade window.
4/11/19 - Creating and Animating 3D Text - Create a new Maya Scene called "L3Practice4". Follow along in the video as you go over how to add text as well as how to make it 3D. You'll also learn how to animate the text as well. For the text, type whatever words you like.
